Library Integration for IMU - Preparing the Sensor

 |

|
Preparing the Sensor
If you intend to integrate the RidgeRun Video Stabilization Library into your application, you may be interested in wrapping the sensor into our interface. So that the API will be uniform, including the timestamps. In this case, you can follow Adding New Sensors for reference.
Determining the Orientation
The IMU orientation plays a relevant role since there can be different physical configurations or hardware mountings. For instance, the camera can be straight, but the IMU can be upside down. It implies that the measurements change signs or swaps amongst them.
To fix possible axes exchange, it is possible to utilise two techniques:
1) Using the datasheet to determine the IMU position: This one allows you to know the axis from the IMU sensor.
2) Using the video movements until reaching the correct orientation: This option is more empirical, but provides an interactive way to get the correct axis.
Understanding the Axes and Mapping System
In the context of imaging, we assume that the image is represented in a 2D plane with X and Y axes, representing the horizontal and vertical positions, respectively. However, the actual camera movement can also include depth changes, represented in the Z axis, as follows:
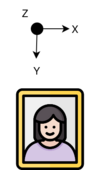
Given how the image is represented digitally (pixel coordinates), the Y is a negative axis in this context.
On the other hand, the IMU can be placed given a rotation: flipped horizontally, vertically, or rotated. In this case, we are going to explain how to determine the orientation given a use case.
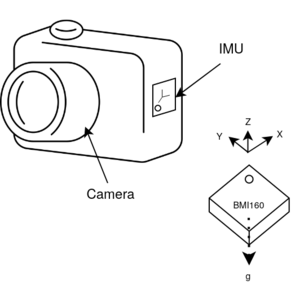
In the use case presented above, the camera has an IMU placed vertically, with the top looking at the camera's left side. Moreover, the IMU coordinates are presented in terms of the chip's first pin (reference pin).
The RidgeRun Video Stabilization library allows the user to choose the orientation of the axes. In this case, we represent the mapping as follows:
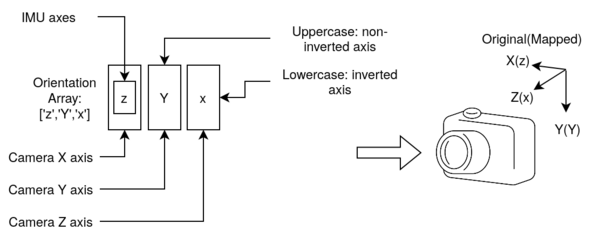
Given an orientation array of three fields, it is possible to assign the mapping from the sensor reference system to the image reference system. In this case, the order of the array provides the axes of the image reference system in the X, Y, Z order. The content of the array provides the axes in the sensor reference system. In the example, the mapping is the following:
Image     Sensor
  X   ->    z
  Y   ->    Y
  Z   ->    x
Please, pay attention to the camera orientation, which is affected by the view and orientation. In the end, the final image view is taken into account and not the lens orientation, given that optical reflections can happen in the process.
Using the Datasheet
IMU datasheets often offer information about the orientation of the movements with respect to the chip orientation.
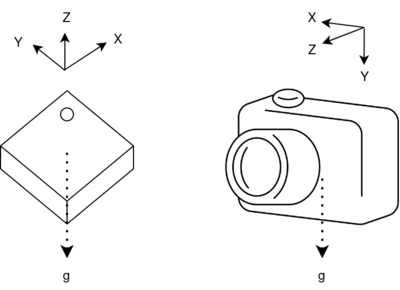
The image above illustrates a redrawn diagram extracted from the BMI160 documentation next to the camera and its axes. The idea is to place the IMU in the camera in a certain orientation and then match the axes mapping with the orientation array. To illustrate this, please, refer to the following use case, where the sensor is vertically placed:

In this particular case, the sensor mapping process involves rotating the sensor until the axes match. In this case, the Z axis requires inversion, which implies that the orientation array should be defined as 'X', 'Y', and 'z'.
Using the Live Video
When using the live video, the idea is to iterate the orientation array by swapping those axes that provoke movements in a opposite direction from the supposed ones. The supposed video movement is as follows:
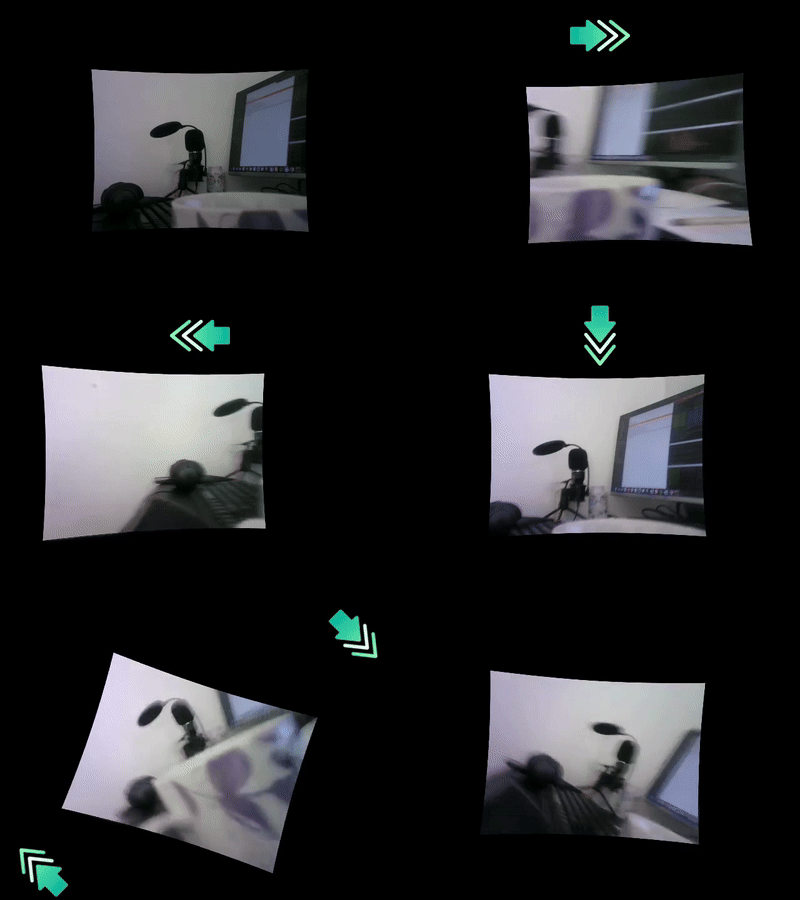
The camera's movements must counter the movement of the image window. In the image from above, when the camera is moved up, the image moves down. When the camera is moved to the right, the image moves to the left.
In case of a mismatch, it is critical to identify how it is moved to match the video. In this case, if the camera moves left and the image goes up, it is possible that the X and Y are swapped and one of them is inverted.
This is an empirical and iterative method through trial and error.
For easiness, we propose a tool to assist in the calibration of the IMU.
Using the rvs-imu-orientation-calibration Tool
At RidgeRun, we have developed a tool for determining the orientation mapping for evaluation purposes. It consists of an application that asks the user to move the IMU to certain positions and computes the mapping from them. It only uses the IMU, and no camera is required, and it is automatically installed into the system.
The usage of the application is the following:
---------------------------------------------------------
 RidgeRun Video Stabilisation Library
 IMU Orientation Calibration Tool
---------------------------------------------------------

Usage:
    rvs-imu-orientation-calibration -d DEVICE -s SENSOR -t SAMPLETIME -f SENSOR_FREQUENCY

Options:
    -h: prints this message
    -d: device. It can be the path or an identifier.
        For example: /dev/i2c-7
    -t: sample time. Time between calibration movements.
        For example: 3 stands for 3 seconds (def: 3)
    -f: sensor frequency. Sampling frequency of the sensor.
        For example: 200 stands for 200Hz (def: 200)
    -p: enable the plotter
    -s: sensor model. It is the sensor enumeration supported by the library.
        Some of them are: Bmi160 Rb5Imu Icm42600
For the BMI160 connected to the /dev/i2c-8 device node with a data collection during 3 seconds and 200 Hz sampling, the command is:
./build/tools/rvs-imu-orientation-calibration -d /dev/i2c-8 -s Bmi160 -t 3 -f 200
After the start, the tool will ask if the user is ready to move the sensor:
[INFO]: Please, have a look at the following instructions:

Before starting, place the camera in a neutral position (looking to an object). In each movement, perform the movement using rotations of more than the angle specified. For instance, if the tool asks for 'Move the camera up', rotate it up until reaching more than 60 degrees with respect to the neutral position during the time while the other instruction appears. Please, check our developer wiki for more details and how these movements look like.

Type 'Y' to start, other key to exit and then press Enter: y
In this case, the movements asked by the application are about 60 to 80 degrees.
An example of the instructions are:
[WARN]: Hold the camera in the neutral position
[WARN]:     Captured checkpoint: 427
[WARN]: Move camera to the right, at 60 degrees
[WARN]:     Captured checkpoint: 856
[WARN]: Move the camera in the neutral position
[WARN]:     Captured checkpoint: 1284
[WARN]: Move camera down, to -60 degrees
[WARN]:     Captured checkpoint: 1713
[WARN]: Move the camera in the neutral position
[WARN]:     Captured checkpoint: 2142
[WARN]: Rotate camera clockwise, at 60 degrees
[WARN]:     Captured checkpoint: 2571
[WARN]: Move the camera in the neutral position
[WARN]:     Captured checkpoint: 3000
[INFO]: Stabilised samples: 298
An illustration of the instruction mentioned above is the following:

After that, the orientation is printed as follows:
[INFO]: Checkpoints from 42 to 85 has critical points in:
[INFO]:   Critical Index: 64
[INFO]: Checkpoints from 128 to 171 has critical points in:
[INFO]:   Critical Index: 138
[INFO]: Checkpoints from 214 to 257 has critical points in:
[INFO]:   Critical Index: 227

[INFO]: Orientation: zyx
In this case, the orientation array to use is {'z','y','x'}.
If the plotter is used, it is possible to adjust the axes intuitively:
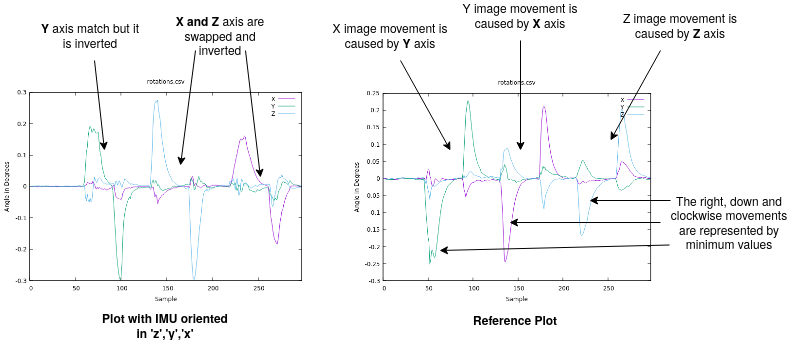
In this example, the plot on the left is generated by an IMU that is oriented in 'z', 'y', and 'x', and the right plot is a reference plot of how the axes need to behave to work accordingly. From the plot, it is possible to see inversions and also axes swapped.
Wrapping the Measurements
In case you want to add RVS into your code base
In case you don't want to integrate your sensor into the library, you can wrap the measurements into the SensorPayload structure.
Assuming that the sensor provides both accelerometer and gyroscope data, we can fill these data into the SensorPayload. First, we have to construct the Point3d, composed by four members: x, y, z, and timestamp:
- The accelerometer data is given in
- The gyroscope data is given in
- The timestamps are in microseconds.
The following snippet illustrates how to construct the point 3D for both:
// Assume that the data comes is already in the following variables:
float ax, ay, az;   // Accelerometer
float gx, gy, gz;   // Gyroscope
uint64_t timestamp; // Same for both (it must match the capture time)

Point3d accel;
accel.x = ax;
accel.y = ay;
accel.z = az;
accel.timestamp = timestamp;

Point3d gyro;
gyro.x = gx;
gyro.y = gy;
gyro.z = gz;
gyro.timestamp = timestamp;
After constructing the Point3d, it is time to construct the SensorPayload.
// Assume that the data come from the snippet before
// Point3d accel;
// Point3d gyro;

SensorPayload reading;
reading.accel = accel;
reading.gyro = gyro;
Reading from an Existing ISensor adapter
If the sensor is already wrapped as an ISensor, reading the sensor is usually done in another thread different from the video capture. The process of reading the sensor is the following:
// Creating a sensor and starting it (RB5 IMU for this example)
auto imu_client = rvs::ISensor::Build(rvs::Sensors::kRb5Imu, nullptr);

// Include the frequency, sample rate, sensor ID and orientation array mapping
std::shared_ptr<rvs::SensorParams> conf =
    std::make_shared<rvs::SensorParams>(rvs::SensorParams{kFrequency, kSampleRate, kSensorId, {'z', 'y', 'x'}});

imu_client->Start(conf);

// -- In another thread. Read --
std::shared_ptr<rvs::SensorPayload> payload = std::make_shared<rvs::SensorPayload>();
imu_client->Get(payload);

// Now, *payload has the sensor data

// Stop: when finishing the execution
imu_client->Stop();
You can have a look at the available examples in Examples Guidebook.
Informing the Integrator About the Data
The integrator must be aware of the available data through the IntegratorSettings. The following data fills the details:
// Assume that the data come from the snippet before
// SensorPayload reading;

auto settings = std::make_shared<IntegratorSettings>();
settings->enable_gyroscope = true;
settings->enable_accelerometer = true;
settings->enable_complementary = false;
The IntegratorSettings defines if the integrator can use the gyroscope and the accelerometer data. The gyroscope is mandatory to be present for the RidgeRun Video Stabilization Library to work. The accelerometer data is optional and enhances the gyroscope biasing. On the other hand, the complementary allows the complementary-based algorithms to use the accelerometer data for fixing the gyroscope biasing.


